Prerequisites What You Need Before Starting
Before diving into connecting your Windows PC to a Linux server using WinSCP and SFTP, let’s get your basics covered. Here’s what you need:
-
Hardware and Software Requirements
- Windows 10 or 11 installed on your PC
- A Linux server with SSH and SFTP enabled
- Admin access credentials (username and password or SSH key) to the Linux server
-
Verify Server Readiness
- Check that SSH port 22 is open and accessible
- Confirm firewall rules allow SFTP connections
- Ensure your user account has the necessary permissions for file transfer
-
Why SFTP Over FTP or SMB
- SFTP encrypts data during transfer, keeping files safe
- It uses secure authentication methods, reducing risk
- Better suited for remote Linux server management than FTP or SMB
-
Pro Tip
- FileZilla is a good free SFTP client alternative, but WinSCP stands out with superior scripting options and advanced synchronization features—perfect for automating and scaling your file transfers
Having these ready sets you up for a smooth connection with WinSCP and secure file transfer between your Windows PC and Linux server.
Step 1 Download and Install WinSCP on Windows
Start by downloading WinSCP from the official site: https://winscp.net/eng/download.php. This ensures you get the latest, safest version without any unwanted extras.
To install, just run the downloaded executable. When the installer opens, choose the Standard installation for most users—it’s straightforward and sets up everything you need. If you prefer, you can select Portable mode to run WinSCP without installing it permanently, useful if you’re working on a shared or limited Windows machine.
Once installed, launch WinSCP and take a moment to check for updates right in the interface. Keeping the app updated is key for bug fixes and smooth connection with your Linux server.
Visual Aid:
Numbered screenshots usually help here, showing the installer steps: download page, setup options, license agreement, installation progress, and the first launch screen. This makes the process even easier to follow.
Step 2 Gather Connection Details from Your Linux Server

Before you connect with WinSCP, you need some key info from your Linux server:
- Hostname or IP address: This tells WinSCP where your server lives.
- Port number: Usually SSH runs on port 22 unless your server uses a custom port.
- Username: Your Linux user name with access rights.
- Password or SSH key: You’ll need one of these to log in.
- Remote directory path: The folder on your server where you want to upload or download files.
Generating SSH Keys (Optional but Recommended)
Using SSH keys instead of passwords is safer and more reliable. You can create a key pair with PuTTYgen on Windows:
- Open PuTTYgen and generate a new key pair.
- Save the private key on your PC.
- Copy the public key and upload it to your server, placing it in the ~/.ssh/authorized_keys file for your user.
Security Best Practices
For a tighter setup on your Linux server:
- Enable key-based authentication in your SSH settings.
- Disable password logins by editing the /etc/ssh/sshd_config file (PasswordAuthentication no).
- Restart the SSH service to apply changes.
This setup not only boosts security but also works seamlessly with WinSCP’s public key authentication for file transfers.
Step 3 Connect to Your Linux Server via SFTP in WinSCP
Once you have WinSCP installed, launch it and open the Site Manager. Click New Site and choose SFTP as the file protocol. This ensures your connection is secure, using SSH to encrypt your file transfers.
Here’s a quick breakdown of the fields you’ll need to fill out:
- Host name: Enter your server’s IP address or domain name.
- Port number: Usually 22, unless your server uses a custom SSH port.
- User name: The Linux server account you’re connecting with.
- Password or private key: Depending on your SSH setup, either enter your password or point WinSCP to your private SSH key file.
- Remote directory (optional): Specify a default folder to open after connecting.
After entering the details, click Login. The first time you connect, WinSCP may show a host key verification prompt. This is normal—review the fingerprint from your server and accept it to continue.
If you want to save these details for future use, click Save in Site Manager. This way, you won’t need to re-enter info every time.
Common Pitfalls to Watch For
- Connection refused: Usually means the SSH server isn’t reachable or running. Double-check your SSH service and firewall settings.
- Permission denied: Mostly caused by wrong usernames, passwords, or incorrect SSH key setup. Make sure your user has login access and your keys match.
By following these steps, you’ll create a stable and secure SFTP connection to your Linux server with WinSCP quickly and easily.
Step 4 Transfer Files Securely Between Windows and Linux

WinSCP makes moving files between your Windows PC and Linux server simple and secure using SFTP. Here’s how to get the most out of your transfers.
Basic Transfers
- Drag and drop files easily between the two panels: your local files on the left, remote server files on the right.
- Use queue management for batch uploads or downloads—just drag multiple files or folders, and WinSCP handles them one by one automatically.
- You can pause or cancel transfers anytime without losing progress.
Advanced Features
- Directory synchronization lets you keep folders on Windows and Linux in sync. Choose mirror mode to make one folder exactly like the other, great for backups or project syncing.
- Edit files directly on the server using WinSCP’s built-in text editor. Changes save straight to the Linux server without needing to download and re-upload.
- WinSCP supports resume interrupted transfers, so if your connection drops, it picks up right where it left off without restarting the upload or download.
Real-World Examples
- Upload your website files to the Linux server quickly when you’re ready to update pages or add new content.
- Download log files to your Windows machine for troubleshooting or audits.
- Sync entire project folders to make sure both your local and remote directories are up to date.
By using these features, you’re ensuring secure, efficient file transfers that save time and reduce headaches when working between Windows and Linux.
Step 5 Automate SFTP Transfers with WinSCP Scripting
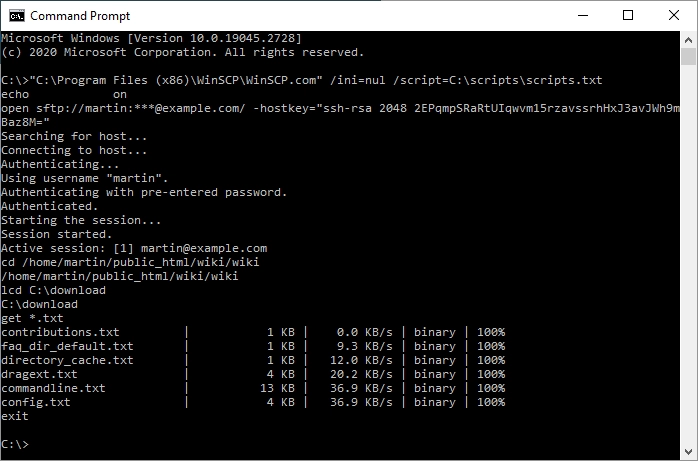
If you’re handling regular file transfers between Windows and your Linux server, automating the process with WinSCP scripting saves a ton of time. WinSCP supports scripting through its command-line interface and a .NET assembly, letting you set up scheduled tasks easily with Windows Task Scheduler.
Here’s a quick look at how it works:
- Use command-line scripts for simple tasks like uploading folders or syncing files.
- Leverage .NET assembly if you need more flexibility inside custom applications.
Simple Script Example
To upload a folder using a script, your basic commands would look like this:
open sftp://username@hostname -hostkey=”ssh-rsa 2048 xx:xx:xx:xx:xx…”
put C:\local\folder\* /remote/folder/
exit
Save this as a .txt or .bat file and call it with WinSCP’s command-line utility. Replace username, hostname, and paths with your actual values.
Integration Tips
- Windows users: Use Task Scheduler to run these scripts at set intervals—like daily backups or syncs.
- Linux users: Combine with cron jobs to trigger transfers when needed.
- PowerShell: Integrate WinSCP scripting within PowerShell scripts for advanced automation or combining tasks.
Automating transfers means fewer mistakes and saves you from repetitive manual uploads or downloads. It’s a solid move for anyone managing multiple servers or handling big projects remotely.
Troubleshooting Common WinSCP SFTP Connection Issues
Even with everything set up right, you might run into connection problems using WinSCP for your Linux server file transfers. Here are some quick fixes for typical issues:
Error specific fixes
- Host key not found: When you connect for the first time, WinSCP will ask to confirm the server’s host key. If you miss this or get a warning later, manually add the server’s key to your known_hosts file or accept the prompt.
- Connection timeout: This can happen if the server or network is slow or blocking SSH ports. Try increasing the keepalive interval in WinSCP settings or check your firewall rules on both ends.
- Permission denied: Check your username/password, or if you’re using SSH keys, make sure the private key file permissions are set correctly (chmod 600 on Linux) and the public key is properly added to the server.
Logs and diagnostics
- Turn on session logging in WinSCP to capture detailed connection info.
- Use these logs to identify handshake failures, authentication problems, or dropped connections.
Performance tweaks
- Increase the transfer buffer size in WinSCP’s settings to speed up large file transfers.
- If SFTP repeatedly fails, try switching to SCP temporarily, which might be more stable depending on the server setup.
For more detailed help, check out the full FAQ section below where I cover common WinSCP connection questions and fixes in depth.
Best Practices for Secure and Efficient SFTP File Management
Security
- Use two-factor authentication (2FA) whenever possible to add an extra layer of protection.
- Restrict user access by setting proper permissions and only granting necessary rights.
- Regularly monitor transfer logs to catch any suspicious activity early.
Efficiency
- Take advantage of WinSCP keyboard shortcuts to speed up your workflow.
- Create custom commands for repetitive tasks to save time.
- Use multi-tab sessions to manage multiple connections in one window without confusion.
Scaling Up
- When handling large files, consider using file compression before transfer to reduce time and bandwidth.
- Collaborate better by sharing sites and settings within your team, ensuring everyone stays in sync.
Following these tips will help you keep your file transfers with WinSCP secure and running smoothly at scale.