Understanding WinSCP Connection Basics: What Are Connection Settings?
When you use WinSCP to connect to a remote server, connection settings are the key details that tell the program how to reach and communicate with that server. These settings include essential components like:
- Hostname or IP address – Where the server lives on the internet or network.
- Port number – The entry point on the server, usually 22 for SFTP or SCP.
- Username and password – Your login credentials to access the server.
- Protocol type – Whether you’re using SFTP, SCP, FTP, or WebDAV.
- Authentication methods – Such as password, public key, or two-factor authentication.
- Advanced options – Like timeout settings, proxy server info, or directory paths.
WinSCP stores these settings in two main ways:
- Stored Sessions – Saved profiles managed in WinSCP’s internal database or INI files, making it easy to reuse your favorite connections without re-entering details every time.
- Quick Connect – Temporary input fields you fill on the fly for immediate connections without saving. This is ideal for one-off or new connections.
Understanding how these connection settings work—and where they are saved—helps you manage your sessions smartly. It ensures fast, secure, and reliable access every time you open WinSCP. Want to dive deeper? Check out our guide on WinSCP site manager for organizing your saved connections efficiently.
Quick Connect vs. Saved Sessions and Use Cases
WinSCP offers two main ways to connect: Quick Connect and Saved Sessions. Each has its own purpose depending on how often and how securely you need to access your servers.
Quick Connect is like a fast lane. You enter your host, username, and password right in the main window and jump into your session immediately—no extra setup needed. It’s perfect for one-time connections or when you’re testing a new server. However, Quick Connect doesn’t save your info beyond your current session, so you’ll need to re-enter details next time.
On the other hand, Saved Sessions store all your connection settings securely within WinSCP. This includes host info, ports, protocols (like SFTP or SCP), and advanced preferences. Saved Sessions are ideal for frequent or long-term connections because they let you organize multiple sites in the WinSCP site manager, saving time and avoiding repeated manual entry.
Use cases at a glance:
- Quick Connect: Fast, on-the-fly login without clutter—great for occasional or testing connections.
- Saved Sessions: For regular workflows, managing several servers, or when you need consistent settings and credentials stored securely.
Choosing between the two depends on your workflow. For everyday use, saving your WinSCP connection settings in sessions helps you stay organized and work faster. For quick tasks or troubleshooting, Quick Connect is your go-to tool.
Why Save WinSCP Connection Settings? Benefits and Local Sync Tips
Saving your WinSCP connection settings brings key benefits that make managing file transfers easier and more secure. Here’s why you should always save your session info:
| Benefit | Description |
|---|---|
| Quick Access | No need to retype host, username, or password every time. |
| Error Reduction | Avoid typos and connection mistakes by reusing saved profiles. |
| Consistency | Use the same settings across sessions for stable transfers. |
| Security | Store credentials securely with encryption options. |
| Efficiency | Quickly connect to multiple sites without hassle. |
Local Sync Tips
If you use WinSCP on multiple devices or want to keep your settings backed up locally, consider these tips:
- Use INI File Mode: Configure WinSCP to save settings in an INI file instead of the Windows registry. It’s easier to copy or sync between PCs.
- Backup Regularly: Manually back up your saved sessions to a secure local folder or external drive.
- Sync with Cloud Storage: Store your INI file or exported sessions in Dropbox, OneDrive, or Google Drive for easy access anywhere.
- Keep Credentials Safe: Avoid syncing passwords in plain text by using WinSCP’s stored credential encryption or key-based authentication.
By saving your WinSCP connection settings, you streamline your workflow and reduce the chance of mistakes. Syncing locally or to the cloud keeps you prepared no matter where you work.
For more details on managing connection profiles, see our guide on WinSCP site manager.
Step-by-Step: Saving Your First WinSCP Connection – Prerequisites and Security Setup
Before you save your first WinSCP connection, make sure you have a few things ready to go:
- Server details: Know your host name or IP address, username, and password or key file for authentication.
- Protocol choice: Decide if you’ll use SFTP, SCP, or FTP based on your server setup.
- WinSCP installed: Have the latest version of WinSCP installed on your Windows machine for best compatibility and security.
- Security basics: If you plan to use key-based authentication, have your private SSH key ready and properly secured.
- Network access: Check that your firewall or VPN allows connections to your target server.
- Data backup: Consider backing up your existing WinSCP configuration (like the INI file or registry entries) in case you need to restore settings.
Setting these prerequisites ensures a smooth connection setup and that sensitive info stays safe from day one. Proper security setup—relying on encrypted keys or strong passwords—keeps your saved sessions protected and ready for secure quick connect later.
For more on basic connection info and configuration, check out WinSCP’s site manager overview.
Creating a New Site and Saving Details
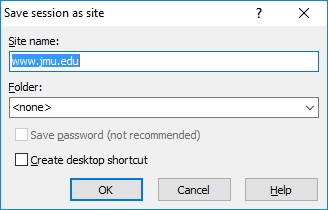
To save your first WinSCP connection, start by opening WinSCP and clicking “New Site” on the left panel. Here’s a quick guide to get your connection details saved properly:
- Enter Hostname: This is your server address or IP where you want to connect.
- Fill in Port Number: Default is usually 22 for SFTP; adjust if your server uses a different port.
- Choose File Protocol: Pick between SFTP, SCP, FTP, or WebDAV depending on your server.
- Add Username and Password: Enter your login credentials. You can also use an SSH private key if preferred.
- Save Session: Hit the “Save” button below the login fields. Give this connection a clear name, so you can easily find it later in the WinSCP site manager.
Saving this site ensures your connection settings are stored locally, so next time, you won’t have to re-enter details. It’s a simple but essential step for efficient workflow and quick WinSCP save connection management.
Step-by-Step: Saving Your First WinSCP Connection – Advanced Options and Troubleshooting
Once you’ve created a new connection in WinSCP, it’s smart to explore advanced options to fine-tune your setup and avoid common issues. Here’s a quick look at what you can adjust and how to troubleshoot typical problems.
Key Advanced Settings to Check
| Setting | What It Does | When to Use |
|---|---|---|
| Environment > SCP/Shell | Choose shell or SCP for command execution | Pick “SCP” for older servers, “Shell” for newer |
| Connection > Timeout | Time before connection attempt is dropped | Increase if your network is slow or unstable |
| Authentication > Private Key | Load your SSH key file for login | Use with key-based authentication |
| Transfer > Passive Mode | Enable passive mode for FTP transfers | Helps with firewalls blocking active FTP |
Common Troubleshooting Tips
-
Connection Fails or Times Out
- Double-check your host, username, and port in the Site Manager.
- Test with a ping or telnet to ensure the server’s reachable.
- Adjust timeout settings under Connection > Timeout.
-
Authentication Errors
- Validate your password or private key file path.
- Check if your SSH key is password-protected and enter the passphrase when prompted.
-
Failed Transfers or Permissions Denied
- Verify folder permissions on your server.
- Switch transfer mode from binary to ASCII or vice versa depending on file type.
-
Settings Not Saving Properly
- Confirm you’re saving in the correct storage mode: either INI file or Windows Registry.
Quick Fixes
- If changes won’t save, try running WinSCP as administrator.
- Export current session settings to back up your connection details before making big changes.
- Use the Keep Remote Directory Up-To-Date option for syncing files automatically.
By taking advantage of these advanced options and troubleshooting steps, saving your WinSCP connection will be smoother and hassle-free. For more insight on managing your settings, you can explore guides on Exporting WinSCP Sessions and WinSCP INI File Backup.
Enabling Quick Connect Toolbar and Navigation
To speed up your workflow, enabling the Quick Connect toolbar in WinSCP is a smart move. This feature gives you direct access to connect right from the main window without digging through menus every time.
Here’s how to set it up:
- Open WinSCP and go to the View menu at the top.
- Select Toolbar, then click Customize Toolbar.
- Look for the Quick Connect button in the list and add it to your toolbar if it’s not there already.
- Once added, the Quick Connect bar will appear, usually right below the main toolbar.
- You can enter your host name, username, password, and select your file protocol (SFTP or SCP) directly here.
- Hit Login to connect instantly without saving a full session.
This setup saves time, especially when you’re connecting to different servers frequently or need a quick test connection.
Also, navigation is smoother with Quick Connect since you don’t have to open the Site Manager every time. Just type in your details, and you’re connected in seconds.
If you want to customize the toolbar further or prefer keyboard shortcuts, WinSCP allows you to personalize it under Preferences > Interface. This makes instant access seamless and suited to the way you work.
For more on managing your connections efficiently, check out this guide.
Custom Quick Connect Profiles and Scripts
WinSCP’s Quick Connect isn’t just for one-off sessions—you can tailor it to fit your routine. Creating custom Quick Connect profiles lets you save frequently used connection details without cluttering your site manager. Here’s how to get the most out of it:
- Save Custom Profiles: Instead of typing credentials every time, save connection settings as custom Quick Connect profiles. This speeds up login and keeps your workflow smooth.
- Use Scripts for Automation: WinSCP supports scripting your Quick Connect connections. You can write simple batch or PowerShell scripts to automate logins, transfers, or specific commands on connection.
- Combine with Command-Line: Pair Quick Connect profiles with command-line switches to launch connections instantly from shortcuts or scheduled tasks.
- Example Script: Create a .bat file with your session info to auto-login:winscp.exe /quickconnect yourusername@hostname /password yourpassword
- Keep Security in Mind: Avoid hardcoding passwords in scripts. Use stored credentials or prompt for passwords where possible.
With custom Quick Connect profiles and scripts, you cut down clicks and launch WinSCP connections on your terms—whether from the desktop, task scheduler, or other tools. It’s a smart way to streamline your file transfers without opening the full site manager every time.
Configuring Quick Connect for Instant Access: Windows Integration and Taskbar Pinning
To speed up your WinSCP workflow, integrating Quick Connect with Windows is a smart move. Pinning WinSCP or specific saved connections to your Windows taskbar gives you one-click access, cutting down on the time it takes to open your favorite sites.
Here’s how to do it:
-
Pin WinSCP to Taskbar:
Right-click the WinSCP shortcut on your desktop or Start menu, then select Pin to taskbar. This keeps the app always handy.
-
Pin Specific Sessions:
Open WinSCP, right-click the saved session you want quick access to, and select Pin to Start. While taskbar pinning of individual saved connections isn’t built-in, this Start menu pinning works well for fast launch.
-
Create Quick Connect Shortcuts:
For instant access to Quick Connect profiles, create desktop shortcuts with command-line parameters pointing to specific saved connections. Pin those shortcuts to the taskbar for seamless access.
-
Use Jump Lists:
Once WinSCP is pinned, right-click its icon on the taskbar to see your recent and favorite sessions listed for immediate connection.
This Windows integration approach complements WinSCP’s Quick Connect toolbar and lets you launch your SFTP or SCP sessions in seconds, saving valuable time during your daily file transfers.
Configuring Quick Connect for Instant Access: Mobile Use and Portable Versions
Using WinSCP on the go or without installing it on every machine is easier with mobile use options and portable versions. Here’s what you need to know:
-
WinSCP Portable Version:
You can run WinSCP without installing it, directly from a USB drive or cloud folder. This keeps your saved connection settings handy wherever you go. Just download the portable build from the official site and place it on your portable drive.
-
Mobile Access Options:
While there isn’t an official WinSCP app for smartphones, you can use third-party SCP/SFTP clients on mobile devices that support importing your saved connection details via export/import. This means you can still connect remotely with your configured settings.
-
Sync Settings for Portability:
Consider exporting your WinSCP settings (including Quick Connect profiles) to an INI file or use cloud storage like OneDrive to keep your sessions consistent when switching devices.
-
Instant Quick Connect:
The Quick Connect feature stays accessible in the portable version, allowing fast logins without losing your saved server info, even on machines without WinSCP installed.
With these options, you get full flexibility to manage your WinSCP connections anytime, anywhere—perfect for tech pros and remote workers who need reliable quick access on any device.
Managing and Organizing Multiple Connections: Site Manager Organization and Bulk Editing
When you have multiple WinSCP connections saved, keeping them organized is key to working efficiently. The WinSCP site manager is your central hub for managing all saved sessions, and it lets you arrange connections into folders, rename them, or reorder the list to suit your workflow.
Tips for Organizing in Site Manager:
- Create folders for different projects, clients, or environments (e.g., Production, Staging).
- Use clear, consistent names to easily identify each connection.
- Add notes or descriptions in the session properties for quick reminders.
- Drag and drop sessions to reorder or move them between folders.
Bulk Editing Saves Time
When you need to update several connections at once, use WinSCP’s bulk editing features:
- Select multiple site entries to change settings like protocol, port, or username without opening each session individually.
- This is a huge time saver when migrating servers or updating credentials.
Keeping your sessions well organized in the site manager not only speeds up daily tasks but also minimizes connection errors. For more on managing your saved sessions with security in mind, check out best credential handling practices.
Explore more on session management and exporting/importing configurations here: https://winscp.uk/wp-sitemap-posts-page-1.xml
Credential Handling and Security Best Practices
 "不支持的图片格式"
https://pub-36eea33d6f1540d281c285671ffb8664.r2.dev/2025/11/04/Secure_Multi-Connection_Credential_Management_AN40.webp)
Keeping your WinSCP connections secure starts with smart credential management. Here’s how I recommend handling your login info for the safest setup:
-
Avoid Saving Passwords When Possible: WinSCP lets you save passwords in your connection settings, but it’s safer not to. If you must, use the encrypted storage option instead of plain text.
-
Use SSH Keys for SFTP Connections: Instead of passwords, set up SSH key authentication. This method is more secure and often faster. Make sure your private key file is safely stored and backed up.
-
Enable Master Password: WinSCP supports a master password that encrypts all your saved sessions and credentials. Set one up to add an extra layer of protection to your connection settings.
-
Regularly Update Passwords and Keys: Don’t let credentials get stale. Rotate passwords and refresh SSH keys periodically to reduce vulnerability.
-
Keep Sessions Private: Avoid sharing saved connection files or exporting sessions with credentials included unless absolutely necessary. If you do share, remove passwords or use secure sharing methods.
-
Use Windows Security Features: Take advantage of Windows user account controls and file permission settings to limit access to your WinSCP configuration files, especially if working on a shared machine.
By following these best practices, you can confidently manage multiple WinSCP connections without worrying about credential leaks or unauthorized access. For more on organizing multiple connections and security, check out Export WinSCP sessions for secure backup options.
Backup Strategies and Automation for WinSCP Connections
Keeping your WinSCP connection settings backed up is key to avoiding headaches from accidental loss or system crashes. Here’s what works best for managing multiple connections efficiently:
- Regular Backups: Set up a schedule to export your WinSCP site manager sessions regularly. This can be done manually or automated using scripts.
- Use INI File Backup: If you use the portable version of WinSCP or store settings in an INI file, back up that file. It stores all your saved sessions and preferences in one place.
- Automate with Scripts: WinSCP supports command-line scripting. You can automate exporting sessions or syncing your configuration with a cloud folder (like OneDrive or Dropbox) for added safety.
- Cloud Sync: Store your exported WinSCP configuration files in secure cloud storage. This helps if you switch between multiple devices or work remotely.
- Version Control: Keep multiple backup copies to track changes over time—handy if you accidentally overwrite important session details.
- Password Security: Always use encrypted backups or secure locations to avoid exposing sensitive credentials.
By combining regular exports, INI file backups, and automation, you reduce risk and save time managing your WinSCP saved connections. This makes it easy to recover your configurations, even after updates or PC switches.
Sharing Sessions Securely
When managing multiple WinSCP connections, sharing sessions securely is crucial, especially if you work with a team. Here’s how to keep your connection settings safe while sharing:
- Use Encrypted Export Files: WinSCP lets you export your saved sessions as encrypted files. Always set a strong password during export to protect credentials.
- Avoid Sharing Plaintext Passwords: Never send connection data with passwords in plain text. Use WinSCP’s built-in secure export instead.
- Leverage WinSCP INI File Backup: Share only the necessary parts by exporting your WinSCP INI file selectively. This limits what others receive.
- Use Secure Channels for Transfer: When sending session exports, use secure methods like encrypted email attachments or secure cloud storage with limited access.
- Configure Access Permissions Locally: On shared PCs, restrict access to WinSCP settings folders or use OS-level permissions to secure session files.
- Consider Portable Versions: Running WinSCP Portable on a USB stick lets you keep your sessions on hand without leaving traces on shared machines.
- Regularly Update and Revoke Access: If sessions are shared temporarily, update passwords afterward and remove access to keep things tight.
Sharing connections securely means balancing convenience and security. With these tips, you can easily collaborate without risking your saved sites or SFTP connection save data.
Export Process and Selective Backups
Exporting your WinSCP connection settings is key to keeping your configurations safe or moving them between devices. WinSCP lets you export your saved sessions and custom settings quickly, making it easy to create backups or transfer your setup.
Here’s how to export your connection settings:
- Open WinSCP and go to Tools > Export/Backup Configuration.
- Choose whether to export to the Windows Registry or an INI file. The INI file option is handy if you want a portable backup.
- Select what to export: session data, preferences, interface settings, or all combined.
- Save the exported file to a secure location, like an external drive or cloud storage.
Selective backups are great if you don’t want to export everything every time. For example, you can export just your saved sites or session passwords, helping keep backups smaller and more focused.
Tips for efficient exporting:
- Regularly back up your sessions especially if you add or update multiple connections.
- Use the INI file export for easy transferring between machines without registry tweaks.
- Store exports in a secure place and consider encrypting backups if they contain sensitive credentials.
Setting up a regular export routine can avoid headaches later, and it’s a simple way to keep your WinSCP connection settings secure and ready whenever you need them. For a deeper dive into managing your saved sessions and exporting WinSCP configurations, check out related resources here.
Importing and Handling Registry Issues
When you import WinSCP connection settings, registry-related glitches can sometimes pop up, especially if you’re moving between different Windows versions or user accounts. Here’s what to keep in mind:
- Run as Administrator: Always launch WinSCP with admin rights before importing .reg files or configurations to avoid permission blocks.
- Check Registry Paths: WinSCP stores session data under HKEY_CURRENT_USER\Software\Martin Prikryl\WinSCP 2 by default. If you import settings from another user or machine, make sure the paths align, or the import might not apply properly.
- Use INI Mode if Troublesome: If you frequently run into registry problems, consider switching WinSCP to INI file storage mode. This saves all settings in a config file rather than the registry, making imports and transfers much simpler.
- Backup Before Importing: Always export your current registry or INI file backup before importing new settings. This protects you from overwriting or losing important configurations.
- Fix Permission Issues: If you receive errors about access denied during import, check your user permissions or group policies that might restrict registry edits.
- Manual Edits: For advanced users, editing the .reg file with a text editor before import can help fix broken paths or customize settings on the fly.
Handling these registry-related issues carefully ensures your imported WinSCP sessions load correctly without losing saved connections or credentials. For more on managing WinSCP sessions and configuration, check out how to export WinSCP sessions.
Cross-Device Sync and Cloud Storage
When you work on multiple computers or need a backup of your WinSCP connection settings, syncing across devices is key. WinSCP lets you export your configuration files, which you can store in cloud services like OneDrive, Google Drive, or Dropbox. This way, you can keep your saved sessions, quick connect profiles, and other settings consistent no matter where you log in.
How to set up cross-device sync with WinSCP:
- Export your settings to an INI file or registry file.
- Save the export in a cloud-synced folder on your local PC.
- Import the settings on other devices by pointing WinSCP to that synced file.
- Use portable versions of WinSCP stored on a USB or cloud folder for mobility.
This approach helps you avoid duplicating work or manually transferring configurations. Plus, it acts as an automatic backup in case your primary device fails. Just make sure you keep your cloud account secure since these files often include sensitive credentials.
For details on exporting and importing, check out the guides on Export WinSCP sessions and Import WinSCP configuration. Managing your connection settings this way simplifies your workflow and keeps you connected wherever you go.
Troubleshooting Export/Import Errors
Sometimes exporting or importing your WinSCP connection settings doesn’t go as planned. Here’s how to fix common issues quickly:
-
Export file won’t save or is empty
Check if WinSCP has permission to write files in the target folder. Running WinSCP as Administrator can help. Also, verify there’s enough disk space.
-
Import fails or settings don’t appear
Make sure you’re importing the right file format. WinSCP typically uses .ini files or registry exports. If you exported from the registry, ensure you’re on the same Windows user account when importing.
-
Conflicts with existing sessions
If imported sessions don’t show up, they might conflict with existing saved sites. Try renaming the imported site or removing duplicates before importing again.
-
Registry import issues
Importing registry files (.reg) needs admin rights. If the import doesn’t stick, confirm you’re running the Registry Editor as Administrator.
-
Settings revert after restart
This often means WinSCP saved settings to a temporary location. Check your winSCP.ini file location or switch to storing settings in the registry for consistency.
-
Corrupted export files
If your export file is damaged, try exporting again on a different machine or backup before exporting. Avoid editing export files manually.
By following these quick fixes, you can keep your WinSCP connection settings transferring smoothly without a hitch.
Storage Modes and Command-Line Switches

When saving WinSCP connection settings, understanding storage modes is key. WinSCP offers two main modes: Registry mode and INI file mode. Registry mode saves your sessions and settings directly to the Windows registry, which is convenient but can be tricky when moving profiles between systems. INI mode stores everything in a file, making it easier to back up or transfer, especially if you want to keep your WinSCP INI file backup in sync across devices.
For quick automation, WinSCP supports several command-line switches that let you launch sessions or scripts directly, without opening the full interface. Common switches include:
- /ini=path: Specify a custom INI file for portable setups or multi-profile use.
- /session=session_name: Open a specific saved session right away.
- /script=scriptfile: Run a saved script automatically for transfers or backups.
- /command: Execute direct commands on launch.
Using these switches, you can automate connections and integrate WinSCP easily with other tools or batch files. This is solid for quick access or scheduled transfers without manual input. Just remember, choosing your storage mode wisely helps keep configurations secure and portable—especially important for road warriors or teams sharing settings.
Scripting Saved Connections and Automated Backups
To save time and avoid repetitive work, you can script your WinSCP saved connections and automate backups. This is especially handy if you manage multiple sites or need reliable backups on a regular schedule.
Here’s how to get started:
-
Use WinSCP scripting: WinSCP supports command-line scripts to open saved sessions, transfer files, and run commands automatically. You can create a simple script file with your session name, so you don’t have to manually connect each time.
-
Example script snippet:
open “MySavedSite”
synchronize remote “C:\LocalFolder” “/RemoteFolder”
exit -
Automate backups: Schedule your WinSCP INI file or registry exports with Windows Task Scheduler or a batch file to keep your connection settings safe without manual effort.
-
Combine scripts with PowerShell: You can write PowerShell scripts to run WinSCP commands and export session data periodically, making sure your connection setups are always backed up and up to date.
-
Benefits:
- Consistent backups of your WinSCP connection settings.
- Faster, error-free connection processes.
- Easier management of multiple sites without extra clicks.
This approach ensures you don’t lose valuable connection info and keeps your workflows smooth and automated.
Security Enhancements and Two-Factor Authentication
When it comes to saving WinSCP connection settings, security should always be a top priority. Beyond using strong passwords, you can boost protection by enabling two-factor authentication (2FA) on your server or FTP service. This means even if someone gets your password, they’ll still need a second verification step, like a code from an app or text message.
Here are key security tips for WinSCP connections:
- Use SSH keys instead of passwords wherever possible. SSH keys are tougher to crack and work seamlessly with WinSCP’s saved sites.
- Enable two-factor authentication (2FA) on your SFTP server for an extra layer of security.
- Store your saved sessions securely. If you use the WinSCP INI file to save connections, protect that file with proper Windows permissions or encryption.
- Avoid saving plain-text passwords in your site manager. Instead, rely on Windows Credential Manager or external password managers that support WinSCP.
- Regularly update your client to benefit from the latest security patches and improvements.
- Use automated scripts cautiously. When automating connections, ensure credentials aren’t hardcoded or exposed in plain text.
Adding these security measures ensures your WinSCP quick connect profiles and saved sessions are safe from unauthorized access. This is especially important if you manage multiple connections or share configurations across devices. Remember: protecting your connection settings means protecting your data and business.
Speed Optimization for Low-Bandwidth Use
When working with WinSCP on slow or limited internet, saving connection settings alone isn’t enough—you want to make sure transfers are as smooth and fast as possible. Here’s how to optimize WinSCP for low-bandwidth environments:
- Choose the Right Protocol: SFTP tends to be more reliable on slower connections than FTP because it manages packet loss better. Use SFTP connection save settings for stability.
- Enable Compression: In the advanced site settings, turn on SSH compression. This reduces the data you send and receive but may slightly increase CPU use.
- Limit Transfer Speed: Set a speed limit in the transfer options. This prevents your network from getting overloaded and keeps other activities running smoothly.
- Use Binary Transfer Mode: Binary mode avoids unnecessary data changes that can add overhead, speeding up file transfer.
- Reduce Keep-Alive Frequency: Less frequent keep-alive signals cut down data sent, which helps when bandwidth is tight.
- Batch Transfers: Group files into batches for fewer connection setups, reducing overhead with bulk editing in WinSCP site manager.
- Automate with Scripts: Use saved connection scripts to schedule off-peak transfers, making the best use of your available network.
By tweaking these settings, you’ll get a faster, smoother experience on slow networks while keeping your WinSCP sessions secure and reliable.
Lost Settings After Updates
One common pitfall with WinSCP is losing saved connection settings after an update. This usually happens because WinSCP switches where it stores your configurations during the update process. For example, if you were saving your sessions in the Windows registry and the new version defaults to an INI file, your saved sites won’t show up immediately.
How to avoid losing your WinSCP connection settings after updates:
- Before updating, export your WinSCP sessions using the built-in export feature or back up your INI file if you’re using file-based storage.
- Check your storage mode in WinSCP under Preferences > Storage. Make sure you know whether your settings are saved in the registry or in an INI file.
- After updating, if your saved sessions disappear, try importing your old configuration back or switch back to your previous storage mode.
- Keep a copy of your WinSCP INI file or registry export in a secure location for quick restore if needed.
By following these simple steps, you can safeguard your connection settings and avoid the frustration of rebuilding everything from scratch after an update.
For more about transferring and managing your connections, see our guide on Export WinSCP sessions and Import WinSCP configuration.
Import Failures and Permission Debugging
Import failures in WinSCP often stem from permission issues or incorrect file handling. If your Export WinSCP sessions file or INI configuration isn’t importing correctly, here’s what you should check:
- File Permissions: Make sure the import file isn’t read-only or blocked by Windows security. Right-click the file, select Properties, and ensure “Read-only” is unchecked. Also, unblock the file if there’s a security warning.
- Run as Administrator: Sometimes, WinSCP needs admin rights to write to certain registry keys or configuration paths. Try running WinSCP as administrator during import.
- Correct Import Method: WinSCP can import from INI files, registry exports, or session XML files. Double-check you’re using the right import option under the site manager or preferences.
- Registry Conflicts: If you’re importing from the registry, previous corrupted or partial entries can cause issues. Consider cleaning old session entries with regedit carefully before importing again.
- File Integrity: Verify that the file you’re importing isn’t corrupted or incomplete. Export files saved mid-session or interrupted exports often fail.
- Path Issues: If you moved files between devices, confirm the file paths inside saved sessions are still valid or update them post-import.
If you’re stuck, check WinSCP’s logs for import errors. They can give clues on what went wrong—missing access rights, locked files, or incompatible formats. Following these steps helps you avoid common import headaches and keeps your WinSCP save connection configurations intact.
For detailed import/export tips and session management, you can explore Exporting and Importing Configurations to fine-tune your setup.
Quick Connect Performance Issues

Sometimes, WinSCP’s Quick Connect feature can slow down or act up. Here’s what often causes these performance problems and how to fix them fast:
-
Too Many Saved Profiles: Having a large number of saved Quick Connect entries can bog down the interface. Clean up old or unused connections regularly to keep things smooth.
-
Network Lag: Slow or unstable internet connections impact Quick Connect speed. Check your network before blaming WinSCP.
-
Antivirus or Firewall Conflicts: Security software might scan or block WinSCP connections, causing delays. Add WinSCP to your antivirus or firewall’s trusted list.
-
Corrupt Configuration Files: If your WinSCP INI file or registry entries get corrupted, Quick Connect may freeze or lag. Try exporting your settings, resetting the app, then importing them back.
-
Outdated Software: Running an old version of WinSCP can cause issues. Always update to the latest release for better Quick Connect stability and features.
-
Startup Load: If WinSCP starts with many sessions opening automatically, it can delay Quick Connect responses. Disable automatic session loading if you notice slow starts.
To troubleshoot, start by:
- Restarting WinSCP.
- Cleaning saved Quick Connect entries.
- Testing your internet speed.
- Temporarily disabling antivirus/firewall.
- Updating WinSCP to the latest version.
Addressing these common problems keeps your Quick Connect working fast, helping you jump into your SFTP or SCP sessions without delay.
Quick FAQs on Saved Sites and Sync
When working with WinSCP saved sites and syncing settings, a few common questions come up. Here’s a quick rundown to clear up any confusion:
Q: Why aren’t my saved sites showing after an update?
A: WinSCP updates can sometimes reset your settings if your session data is stored in the registry instead of an INI file. To avoid this, switch to the INI file mode for easier backup and restore.
Q: How do I sync my saved sites across multiple devices?
A: Export your configuration (saved sites and connection settings) to an INI file and store it in a cloud folder like OneDrive or Google Drive. Then, import this on other devices. Automate this using scripts for seamless syncing.
Q: Can I share saved sessions securely?
A: Yes, but always remove or encrypt sensitive credentials before sharing. Export the session data without passwords or use WinSCP’s built-in credential management tied to your user account.
Q: What if WinSCP won’t import my saved sites?
A: Check file permissions on the INI or registry export files. Run WinSCP as an administrator if needed. Also, confirm the export format matches the import option (INI export vs. registry import).
Q: Does Quick Connect save my login details permanently?
A: Quick Connect is designed for quick short-term connections and doesn’t save passwords long-term by default. For persistent storage, save your connection as a site in the Site Manager.
Keeping these FAQs in mind helps prevent common headaches with WinSCP connection management and keeps your workflows smooth.